
Michael Taylor tackles one of the most overlooked yet crucial aspects of trading: position sizing. Get this wrong and you risk blowing up your account — get it right and you give yourself the best chance of staying in the game long enough to win.

Let’s get one thing straight. Position sizing isn’t glamorous.
There are no YouTube videos titled “How I Made £10k in a Day Using Position Sizing!” (though you will find one by me detailing how to scale to your first £100,000) and you won’t find any Instagram posts showing off position sizing calculators next to rented Lamborghinis.
But here’s the truth: if you get position sizing wrong, nothing else matters.
You could have the best stock-picking ability since Warren Buffett’s heyday, but poor position sizing will still blow up your account faster than you can say “Carillion”.
I learned this lesson the hard way early in my trading career.
Like most beginners, I thought trading was all about finding the next big winner.
I’d spend hours analysing charts, reading company reports, and convincing myself I’d found the next Amazon. Then I’d pile half my account into it because I was “so sure” it would work.
Sometimes it did, and I felt like a genius. More often, it didn’t, and I’d watch a larger than intended chunk of my capital evaporate.
Position sizing is what separates professional traders from gamblers.
It’s the difference between surviving your inevitable mistakes and joining the 80%+ of retail traders who lose money.
Yet it’s probably the more overlooked aspects of trading education, which is crazy when you consider it’s literally what determines whether you stay in the game long enough to improve.
What Is Position Sizing?
Position sizing is simply deciding how much of your capital to risk on any single trade.
It’s not about how much you invest – that’s a common misconception. It’s about how much you’re prepared to lose if the trade goes against you.
Think of it like this: if you’re driving to Scotland (and let’s assume you don’t live in Scotland already), you don’t fill your petrol tank based on how confident you are about reaching your destination. You fill it based on how far you need to travel and what your car can handle.
Position sizing works the same way – it’s based on mathematical principles. Not emotions or confidence levels.
The key insight here is that position sizing is the only element of trading you have complete control over.
You can’t control whether the market goes up or down, you can’t control what other traders do, and you can’t control external events that might affect your stocks. But you can control exactly how much you risk on each trade.
The 1% Rule: Your Starting Point
Most professional traders never risk more than 1-2% of their total capital on any single trade. This might sound conservative, but it’s actually liberating once you understand the mathematics behind it.
Let’s say you have a £10,000 trading account and you stick to the 1% rule. This means you never risk more than £100 on any single trade. If you buy shares at 200p each and set your stop loss at 180p then you’re risking 20p per share. Divide your maximum risk (£100) by your risk per share (20p), and you get 500 shares maximum.
This approach means you can be wrong 10 times in a row and still only lose 10% of your account. Compare this to the beginner who risks 10% per trade and is wiped out after the same 10 losing trades. The mathematics are brutally simple, yet most new traders completely ignore them.
You can use my position size calculator to do this.
You input your account size, your maximum risk percentage, your entry price, and your stop-loss level. The software calculates your maximum position size automatically. You should always double check the maths in your head to be sure!
The Stop Loss: Your Risk Anchor
Before you can calculate position size, you need to know where you’ll exit if the trade goes wrong. This is where your stop loss comes in, and it should be based on technical levels, not arbitrary percentages.
Look at the chart and identify the obvious support level below your entry point. This might be a previous reaction low, a round number, or a significant moving average. Your stop loss should go just below this level – far enough to avoid being stopped out by normal market noise, but close enough to limit your losses.
For example, here’s a recent chart of JD Sports.
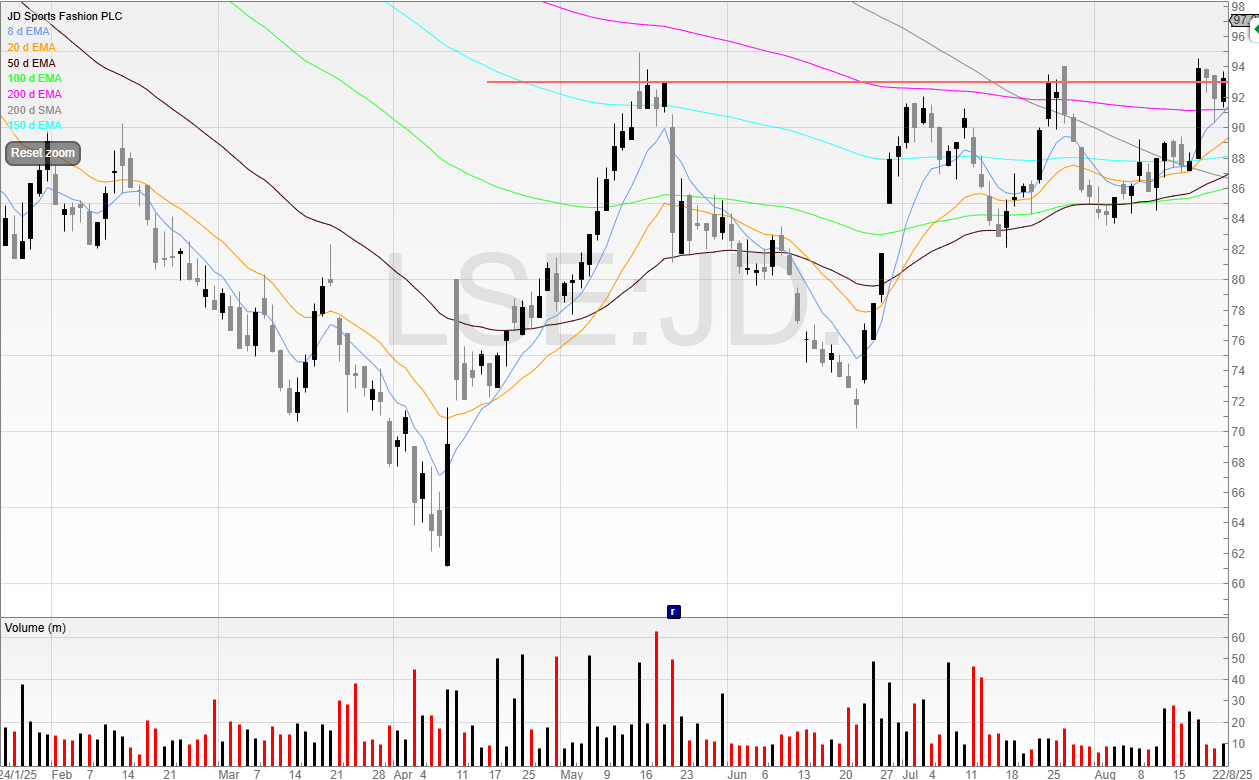
Let’s say you want to buy the breakout here.
We can see that the stock has been bouncing off the 50 EMA (the black line) repeatedly and so we can look to use this as support.
Now, we can see that the stock has traded below the black line a few times to test liquidity under there.
If we place our stop too tight – we’ll see our stop drilled and be taken out of the position. That’s no good.
Ideally, we want to place the stock a bit further below this zone in order to avoid being in the stop loss liquidity. This gives the stock room to breathe while keeping your risk defined. If the breakout fails and the stock falls back below support, you want to be out of the trade.
Nevet move your stop loss further away from your entry price once you’re in a trade. This is like removing your seatbelt because you’re driving more carefully – it defeats the entire purpose.
You set that stop before you entered the trade and before you became one big bowl of Bias Bolognese.
The only acceptable move is to raise your stop loss as the stock moves in your favour in order to lock in profits.
The Psychology of Small Positions
Here’s where a lot of traders struggle with position sizing…
It feels like you’re not making enough money.
When your positions are properly sized, individual trades won’t make dramatic differences to your account balance. This is exactly the point.
Small positions remove the emotional intensity from trading.
When you’re only risking 1% per trade, you can afford to be wrong repeatedly without panicking.
This emotional detachment is crucial because it allows you to stick to your system and make rational decisions.
I’ve noticed over the course of my career that my best trading periods coincide with when I’m most disciplined about position sizing.
When my positions are small enough that I sleep soundly regardless of what happens overnight, my decision-making improves dramatically.
I’m more likely to let winners run and cut losses quickly because each individual trade doesn’t feel make-or-break.
Conversely, when I’ve oversized positions in the past, my performance suffered. I’d exit winners too early to lock in profits and hold losers too long to avoid taking the painful loss.
Both behaviours are deadly to long-term returns.
Look out for Part I where we’ll cover advanced position sizing concepts with more examples.
Michael Taylor
Get Michael’s trade ideas: https://newsletter.buythebullmarket.com/
Free educational content: @shiftingshares
This article is for educational purposes only. It is not a recommendation to buy or sell shares or other investments. Do your own research before buying or selling any investment or seek professional financial advice.


This article hits the nail on the head about position sizing! Finally, someone explains clearly why managing risk is key, not just picking winners. The 1% rule makes total sense and really puts things into perspective. Great practical advice for avoiding common pitfalls.
Wow, this really hits home! I made the same mistake early on, thinking it was all about picking winners. It took a few big losses to learn that position sizing is the real game changer. Keeping losses small is key, right?
f we place our stop too tight – we’ll see our stop drilled and be taken out of the position. That’s no good.